Tuesday, June 8, 2010

On Design

The most important thing to learn about design is that it’s all about trade-offs. There are no perfect designs. Every design has a down side, some draw drawback that will cause difficulties. The is true for all kinds of design whether it’s a building, an organization, a user interface, or software.

Since all designs have problems, the designers job is not to get rid of all problems in the design, it’s to decide which problems are the least costly to have, or which problems are most likely to cause the least damage to the goal of the product. So, to do design well you have to be able to understand what the options are, what the issues are with each option, and in the particular context you are operating in, which issues are the least harmful.

It’s important to understand this when it comes to software design patterns. Design patterns are just common ways of trading one set of problems for another, with the belief that the new set of problems is better than the old. The only time it makes sense to use a pattern is when you have the particular set of problems it was designed to fix, and you’re better off with the new set of problems it leaves you with. But, in order to make good decisions on this, you’ve got to understand what the problem sets are, and how they affect your particular context.

This is not easy! And it takes experience to do it well. Often, the only way to know what the issues are with a particular design choice is that you’ve done it that way before, and seen what issues came from it. However, studying, practicing, and learning from others can take you a long way. The important thing is to never to be fooled into thinking that there are no drawbacks to a particular design decision.

Tuesday, June 1, 2010

Auto injection in jUnit

After doing Java for many years, and TDD for several, I’ve settled into a fairly consistent way of designing and testing my classes. Any time you start to following a pattern in your code, if you’re paying attention, you’ll notice you’re writing the same code over and over. Now, it usually isn’t exactly the same or you’d easily just move it into a class and use the class. No, it’s usually code that is different every time, but it’s essentially doing the same thing, just with different classes. This is one example of what is generally referred to as boilerplate code. It’s aso one of the subtle forms of code duplication, and it’s something you want to avoid as much as possible.

I recently noticed that due to how I write my classes and tests, around 95% or more of my setup methods in my tests consisted of creating the class to be tested, creating some mocks, stubs, or fakes, and then injecting them into the class. Sure, technically every setup method was different, but this was boilerplate code for sure. And it was starting to get on my nerves. The setup usually looked something like this:

public class TestFoo {
   private Foo foo;
   private DependencyOne dependencyOne;
   private DependencyTwo dependencyTwo;

   @Before
   public void setup() {
      foo = new Foo();
      dependencyOne = new DependencyOneMock();
      dependencyTwo = new DependencyTwoMock();
      foo.setDependencyOne(dependencyOne);
      foo.setDependencyTwo(dependencyTwo);
   }
   ... then all the tests
}

One of the best ways to attack boilerplate code is by using the concept of convention over configuration. Basically all my setup methods were just configuration of the class I was testing, so what I needed to do is come up with a convention that made the configuration unnecessary, and some way to act upon the convention.

The convention starts with the @Target annotation. The idea is that you put this annotation on a field to signify that the field is the target of the test class that will need to have dependencies injected into it. You can also put @Target on a method, and whatever is returned from the method will be used as the target for injection.

Secondly, when you define a field on the test class if it matches a setter method on the target class, then it will be injected into the target using the setter. If no setter is found, but there is a field with the same name on the target, then the value will be copied to the field on the target.

In order to actually act on this convention I used the jUnit @Rule annotation. I called my rule AutoMockAndInject. If you aren’t familiar with how this annotation works, you can read about it here. I will put the code for my rule and the target annotation at the bottom of this post.

So, following the convention and using the rule my test class now looks like this:

public class TestFoo {
@Rule public AutoMockAndInject autoInject = new AutoMockAndInject();
@Target private Foo foo = new Foo();
private DependencyOne dependencyOne = new DependencyOneMock();
private DependencyTwo dependencyTwo = new DependencyTwoMock();

   ... then all the tests
}

One thing to remember here is that jUnit creates a new instance of the test class for each test method it runs. Otherwise, doing it this way could cause some problems.

I also use Mockito when I don’t want to make a hand written mock. The AutoMockAndInject rule works with the @Mock annotation from Mockito. It will create the mock object and inject it into the target. So if I want to use Mocito for my dependencies instead of hand written ones, the test class would look like this:

public class TestFoo {
@Rule public AutoMockAndInject autoInject = new AutoMockAndInject();
@Target private Foo foo = new Foo();
@Mock private DependencyOne dependencyOne;
@Mock private DependencyTwo dependencyTwo;

   ... then all the tests
}

I just started doing this a couple weeks ago, and so far I like it. It’s cut down on a lot of boilerplate code. But, in my experience, it usually takes at least a few months of doing something before you really see if it was a good idea or not. So, we’ll see if in the long run it really makes thing better.

Here is the code for my annotation and the jUnit rule I used for doing this.

@Retention(RetentionPolicy.RUNTIME)
public @interface Target {
}

public class AutoMockAndInject implements MethodRule {
   private static final String specialFields = "$VRc,serialVersionUID";
   private Object target;

   public final Statement apply(final Statement base, FrameworkMethod method, final Object target) {
      return new Statement() {
         @Override public void evaluate() throws Throwable {
            before(target);
            base.evaluate();
         }
      };
   }

   protected void before(Object source) throws Throwable {
      createMockitoMocks(source);
      if (hasTargetAnnotation(source))
      autoInject(source);
   }

   private void createMockitoMocks(Object source) {
      MockitoAnnotations.initMocks(source);
   }

   private boolean hasTargetAnnotation(Object source) throws Exception {
      return hasTargetFiled(source) || hasTargetMethod(source);
   }

   private boolean hasTargetMethod(Object source) throws Exception {
      for (Method method : source.getClass().getMethods()) {
         if (method.getAnnotation(Target.class) != null) {
            target = method.invoke(source);
            return true;
         }
      }
      return false;
   }

   private boolean hasTargetFiled(Object source) throws Exception {
      for (Field field : getAllFields(source.getClass())) {
         if (field.getAnnotation(Target.class) != null) {
            target = getFieldValue(source, field);
            return true;
         }
      }
      return false;
   }

   private Object getFieldValue(Object target, Field field) throws Exception {
      field.setAccessible(true);
      return field.get(target);
   }

   private Set<Field> getAllFields(Class<?> clazz) {
      return getAllFields(new HashSet<Field>(), clazz);
   }

   private Set<Field> getAllFields(Set<Field> fields, Class<?> clazz) {
      for (Field field : clazz.getDeclaredFields())
         if (notSpecialField(field))
            fields.add(field);
      if (clazz.getSuperclass() != null)
         getAllFields(fields, clazz.getSuperclass());
      return fields;
   }

   private boolean notSpecialField(Field field) {
      return !specialFields.contains(field.getName());
   }

   private void autoInject(Object source) throws Exception {
      ensureTargetExists();
      Set<Field> targetFields = getAllFields(target.getClass());
      for (Field field : getAllFields(source.getClass()))
         if (!callSetterIfExists(source, field))
            setFieldIfExists(source, targetFields, field);
   }

   private void ensureTargetExists() {
      if (target == null)
         throw new RuntimeException("Target value is null, did you forget to create it?");
   }

   private boolean callSetterIfExists(Object source, Field field) throws Exception {
      Method method = getMethod(target, getSetterName(field));
      if (method != null) {
         method.invoke(target, getFieldValue(source, field));
         return true;
      }
      return false;
   }

   private Method getMethod(Object target, String setterName) {
      for (Method method : target.getClass().getMethods())
         if (method.getName().equals(setterName))
            return method;
      return null;
   }

   private String getSetterName(Field field) {
      return "set" + StringUtils.capitalize(field.getName());
   }

   private void setFieldIfExists(Object source, Set<Field> targetFields, Field field) throws Exception {
      Field destField = getField(field.getName(), targetFields);
      if (destField != null)
         setField(target, destField, getFieldValue(source, field));
   }

   private Field getField(String name, Set<Field> fields) {
      for (Field field : fields)
         if (field.getName().equals(name))
            return field;
      return null;
   }

   private void setField(Object target, Field destField, Object fieldValue) throws Exception {
      destField.setAccessible(true);
      destField.set(target, fieldValue);
   }
}

Thursday, May 27, 2010

Code duplication is evil

As you’re programming, have you ever had the sense that a great evil was lurking in your code base? Well, most likely there is, and it’s name is: code duplication! This monster will sneak it’s way into your code with the promise of “fast” implementation and a “simple” solution. But make no mistake, once it has a foothold in your code base, what you thought was your friend will turn on you with a vengeance and destroy you. The code will rot in it’s place, and you’ll be cursed with recurring bugs that come back because you only fixed them in one place. Then your friends will laugh at your plight and make up nick names for you like “Mr. Duplication” or “Copy and paste Man.” In the end you’ll be left homeless and penniless. Then you will rue the day that you ever gave in to the subtle and poisonous promises of code duplication.

I’m not sure everyone sees it this way, though. I’ve said for a while now that the best way I know of to get to a well factored system is to have an acute aversion to code duplication. Both the obvious and subtle forms of it. However, despite the fact that the DRY principle is well known, I find that many developers (perhaps most) not only often repeat themselves in their code, but they also seem to be unconcerned when they find duplicated code and have to modify it. Personally I think the latter is the biggest issue.

We all write bad code some times, and we do stupid things like giving in to the temptation to duplicate. Many strange and terrible things can be done in the heat of the moment while programming and trying to implement a feature (even if you are pairing). To ere is human and it’s perfectly understandable. However, to come across blatant duplication and not only do nothing about it, but to be unmoved by it, that my friends is inexcusable.

Of all the code smells there are, code duplication is one of the most telling. So much can be learned from it, if you’re paying attention. Some times it can tell you that your design is not quite right. Or that you’re missing an abstraction. Or that you’re thinking about the problem in the wrong way. Often a lot of code duplication can be removed by solving the coding problem from a different angle.

There’s more that can be learned than just the few things I mentioned, but you will see none of these things if, when you encounter code duplication, you merely make the required changes in multiple places. You have to learn to hate it! You should be outraged by it. Don’t stand for it! When you see blatant code duplication, leap out of your chair, grab your keyboard and start slamming in on the table while yelling at your monitor, “NO! NO! NO! NO!” Sure, everyone will think you’re crazy, and I suppose you might even get fired, but after an out burst like that you’ll be determined to do something about the duplication. And, who knows, after a few of them, maybe others will be more careful about it, being frightened by what you might do next time.

When you see the evil of code duplication, don’t let yourself be unmoved by it. Be outraged if it helps, but do something about it. How long will we allow this great evil of our time to endure? As the saying goes: all that is necessary for the triumph of evil is that good programmers do nothing.

Wednesday, February 24, 2010

Good article on Gradle

I happen to come across this great introductory article about Gradle:

http://www.javaexpress.pl/article/show/Gradle__a_powerful_build_system

It’s a lot better than the one I wrote, and should get you going in no time.

Tuesday, February 23, 2010

Gradle: building with bliss

I’ve used Ant for years, and though the XML can get annoying, it’s a great tool. It’s so flexible, and once you understand it, you can do anything with it. Gant addresses the XML issue by introducing a Groovy syntax for writing Ant scripts. But one of the biggest issues with Ant, in my opinion, is the amount you have to write just to get a basic build that compiles some classes, runs some test, and builds a JAR or WAR.

One solution to this is Maven. Another nice tool, though it uses XML also. With Maven you can have a build up and running in minutes. But Maven takes a rather radical approach. With Maven, you don’t have a build file, you have a Project Object Model (POM). You use the POM to declaratively describe your project. Then all the Maven plugins use that information and fallow a build lifecycle to do the actual build. So, you don’t have a build file anymore, the build is just something that happens based on what you have in your POM. The Maven people are pretty big on the whole declarative POM describing your project. This line of thought is illustrated by a quote from the Maven AntRun Plugin page:

It is not the intention of this plugin to provide a means of polluting the POM, so it's encouraged to move all your Ant tasks to a build.xml file and just call it from the POM using Ant's <ant/> task

In other words, “don’t defile our beautifully declarative POM with your dirty procedural Ant scripts.”

The declarative concept is really neat in theory, but builds are a procedural process. So at times it feels to me like Maven is forcing something unnatural. And any time you want to add just a bit of logic to your build, you have to go through the effort of writing your own Maven plugin or do it in Ant and use the AntRun plugin. Seems like it should be easier than that, to me.

So, what I really want is a tool as powerful as Ant, as easy to add logic to as Gant, and as quick to setup as Maven. That’s exactly what Gradle is. It has tight integration with Ant, so anything you can do in Ant you can do in Gradle. It uses Groovy for the build scripts like Gant, so adding a bit of logic is easy and natural. And it has a build by convention concept (via plugins) like Maven that allows you to have a build running with a minimal amount of effort.

The most basic build

Here is the most basic Gradle build file you can have for a Java project. In your project root directory create a file called build.gradle and put this line in it

usePlugin 'java'

If you follow the Gradle convention (meaning you put your source code in src/main/java), this one line build file will allow you to compile and JAR your project. By default the name of your project that Gradle uses (and the name on the JAR) is the name of the folder that contains the build.gradle file. To learn how to actually run the build, check out the Gradle user guide.

Running some test

To actually run some tests, we’ll have to add some more too our build. Again, we’ll follow the Gradle convention of putting test in the src/test/java folder and change the build file to look like this:

usePlugin 'java'

repositories {
   mavenCentral()
}

dependencies {
   testCompile 'junit:junit:4.4'
}

With this build file we can now compile our code, compile our tests, run the jUnit tests, and create a JAR. Not bad for just a few lines of Groovy.

Changing the source locations

If you don’t want to follow the Gradle conventions, you can change the locations of your source files and test files. To do this you use the Source Sets concept from the Gradle Java plugin. Adding this code to the build file will change you source location to the src folder under the project root, and the tests to the test folder under the project root:

sourceSets {
   main {
      java {
         srcDir 'src'
      }
      resources {
         srcDir 'src'
      }
   }
   test {
      java {
         srcDir 'test'
      }
      resources {
         srcDir 'test'
      }
   }
}

There’s a lot more to learn about Gradle, and I may post more about it in the future. If you want to learn more, check out the user guide. But honestly the best thing I can say about Gradle is that I barely spend much time working with it. It’s so flexible and easy to work with that most of the time when I need to add something to a build file I can get in there add the logic I need quickly and get it all working in a few minutes, then get back to working on my software. Which is really what you want from a build tool because customers don’t care about builds! So you want a build tool that allows you to accomplish what you need as quickly and easily as possible, so you can get back to doing the work that your customers actually care about. To me, that’s where Gradle really shines.

Wednesday, January 20, 2010

Mercurial and Eclipse

I’m not opposed to using the command line. Some times it’s the best way to get things done. But when it comes to source control I think having good IDE integration really helps with productivity. I’ve been in situations before where there wasn’t good integration, and, though you can certainly get things done like that, I end up fighting with the VCS more often. I think this is especially true when you are working in a team.

So one of the first things I want to know when looking at a VCS is how good the IDE integration is. Thankfully VecTrace has created a good Eclipse plugin for Mercurial. It’s designed to use an external Mercurial executable. So you’ll have to install something like TortoiseHg to do the actually Mercurial work. TortoiseHg is great and on the rare occasion where you can’t get the Eclipse plugin to do what you need, you can always use it, or the command line.

If you are familiar with either the CVS or SVN plugins for Eclipse, the Mercurial one should feel pretty familiar. It’s pretty much the same for the common things like marking a file that needs to be committed, the commit dialog, synchronizing with the main repository, and showing history.

One thing I really like about he Mercurial plugin is the intelligence it uses in marking a file as needing to be committed. With most plugins I’ve used in the past if a file is modified in any way, the IDE flags it has needing to be committed. Even if you undo the changes that you made, it will usually still flag it as needing to be committed. With the Mercurial plugin a file will only be flagged as needing a commit if it’s actually different from the latest version in the repo. So if you change a file, save it, then change it back, it will not show as needing a commit. It’s a small feature, but one I appreciate.

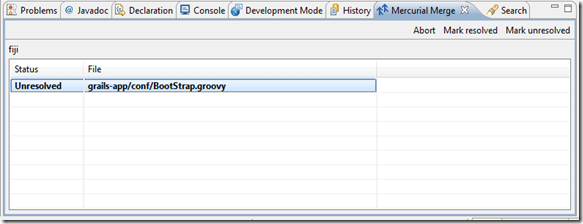
A lot of the time when you have to merge two change sets, the Mercurial will be able to merge them automatically. When there are conflicting changes, however, you’ll have to use the plugin’s merge manager. For the file comparisons it uses the same windows as the other plugins, but there is another view to show the merge status:

mercurial_merge_manager

In this view you can double click the file with merge conflicts to resolve them. Then you can click ‘Mark resolved’ to mark the file resolved. You can also abort the merge from this view, or mark a file as no resolved.

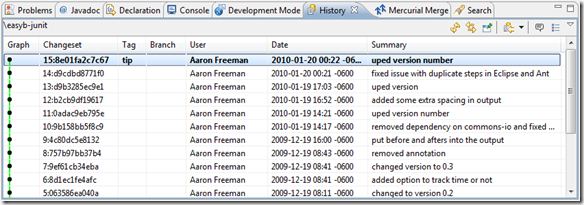
The last nice view that the plugin has is the History view. Here is picture of the history from my Easyb jUnit project:

easyb_junit_history

The history here shows each change set, who committed it, when it was committed along with the comment for the change set. From this view you can choose to update your code to any change set in the list.

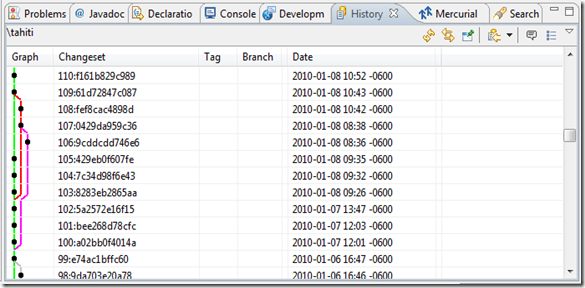
One the left side of the view is the Graph column. This shows how each change set relates to the others. The graph for this project isn’t very interesting since I’m the only developer on this one. So, here’s one from a project with multiple developers:

change_set_history

This graph shows the branching and merging that went on in each change set.

One more nice thing with Mercurial that’s not related to the Eclipse plugin is bitbucket.org. This is the Mercurial equivalent of GitHub. We are currently using it for hosting our repository, and we’re pretty happy with it. It has a lot of nice features, good pricing plans, and allows you to see everything about the project through the web site. There’s also some nice integration with Hudson (which also has a Mercurial plugin) that allows the change descriptions for a Hudson build to link directly to the Bitbucket diff page. Which makes it really easy to se what changed in a particular build and who change it. Good stuff!

To sum it up, I’m really happy with Mercurial. It’s got speed, ease of use, good IDE integration, and a good repository hosting site. I highly recommend it!

Tuesday, January 12, 2010

Mercurial: the basics

The first thing you have to understand when looking at Mercurial is what a Distributed Version Control System (DVCS) is, how it's different then things like Subversion or CVS, and why you would want to use it. So, let me start with a brief answer to those questions.

What and Why

Centralized version control systems like CVS, Subversion, Perforce, and the like operate by having a centralized repository server. Then each client does a checkout of the code from the centralized repository, makes changes, and commits their changes back to the server. A DVCS like Mercurial and Git differ from these in two main ways.

One, when a person wants to get the code form a repository, they don't just checkout the latest version. They actually copy (or clone) the entire repository. They actually pull down every revision of every file in the repo. This only has to be done once, from then on they just have to do an update to pull down any new changes to the repo. Then the person works with their local repo until they are ready to push their changes back to the main repo.

Two, the fact that everyone has a full copy of the repo means this is more of a peer-to-peer technology than a client-server technology. That is, with centralized version control it is clear that the server is the master repo, since it alone holds all the data. But with DVCS everyone holds all the data, so the only thing that makes one repo the master repo is that everyone working on the project decided it would be the master repo. But there is technically no difference between the master repo and all the cloned repos on other peoples machines. We'll talk about the effects of this more as we continue, but lets move on for now.

So, why would you want to use a DVCS? One of the things that I like about it is since it's peer-to-peer there's no server to run. If you want fancy things like web access to a repository, then you'll have to run some kind of server, but if all you want is a repository on your local machine or on your network, then all you need is a directory. All of the logic for a DVCS is in the program that runs on the client. So if you're working on something alone, but you want version control, DVCS is the easiest thing to setup. And if your on a large team of developers, it just so happens that DVCS will work really well for that, too.

With DVCS merging just becomes a way of life. But because of the way it works, merging is usually a lot easier than it can be with centralized version control systems. Also, since each peer has a full copy of the repository, it's like a bunch of automatic backups of your repo. Server crashed? Can't get your main repository back? Not a problem! Just have one of the peers copy their repository to a central location, and have everyone start pushing their changes to it.

Before I started using Mercurial I had heard a lot about DVCS and never understood why everyone thought it was so great. Now I've been using Mercurial for a couple months and there is no way I would ever want to use something like Subversion or CVS again. It is so much faster and better to work with. If you'd like to read more about why DVCS, check out Chapter 1 of Mercurials' definitive guide called How did we get here?

Mercurial vs GIT

Before I say anything on this, let me say that I agree with many others who have said that the important thing is moving from centralized version control to distributed version control. Deciding which DVCS to use is really just a matter of preference. Bot Mercurial and Git are great.

So, why did I go with Mercurial? To be quite honest it's mostly because I tried to get Git working on my machine once, and couldn't figure it out (probably because I didn't understand it). Then, a while later I tried to get Mercurial working, and got it working right away. I'm not sure if my problems with Git were normal, or just plain ignorance on my part, but the end result was I just stuck with Mercurial since then.

Git does seem to have more momentum around the development community, and it looks as though Eclipse might be embracing it as the sanctioned DVCS for Eclipse. But right now the Mercurial plugin for Eclipse seems much farther along that the one for Git. Also, the support for Git on Windows is fare behind that of Mercurial, and with the 139 Git commands it seems quite a bit more complex.

On a very technical side, the Mercurial definitive guide points this out, and I'm sure this is totally unbiased ;)

While a Mercurial repository needs no maintenance, a Git repository requires frequent manual “repacks” of its metadata. Without these, performance degrades, while space usage grows rapidly. A server that contains many Git repositories that are not rigorously and frequently repacked will become heavily disk-bound during backups, and there have been instances of daily backups taking far longer than 24 hours as a result. A freshly packed Git repository is slightly smaller than a Mercurial repository, but an unpacked repository is several orders of magnitude larger.

But, as I said, the important thing is moving to DVCS, not which one you choose.

Change Sets

One of the most important concepts with Mercurial is the Change Set. A change set is a set of files who's modifications where committed to the repo all at once with a commit command. Every change set has a globally unique identifier assigned to it so that Mercurial can always tell one change set from another no matter what machine it came from.

A change set usually has one parent, but will have two when you are doing a merge. A change set can never have more than two parents, though, which helps to limit the complexity of branches and merges in the version tree.

Commands

You use the clone command to clone a repository from the main location like this:

hg clone http://mysite.com/myRepo [destination folder name]

Once you have done this you now have a full copy of the repository. Under the folder you specified there will be a .hg folder. This folder contains all the repo history and information. Everything else under the main folder is called the working directory. (If you want to disconnect the folder from the Mercurial repo, you just have to delete the .hg folder.)

Once you have made some changes you execute the commit command to commit them to your local repository (this creates a change set). Then, once you are ready to share everything with the rest of your team, you do a push. This will push all of the change sets you have committed to your repo out to the main repo that you cloned from.

In order to update your repo with other people's changes you do a pull. This will pull in all change sets in the main repo that you do not have in your local repo. It's important to remember that this will not update your working directory. All this does is pull change sets into the .hg folder. In order to update your working directory to the latest version, you have to do an update.

If you do an update and the change sets you pulled are not descendants of the change set in your working directory, the update will fail, and it will tell you that you have to do a merge. Doing the merge creates another change set that represents the merging of two change sets. You now commit the merge and push the new change set back to the main repo.

That's the basics of how Mercurial works, but there's a lot more to learn. I recommend reading Mercurial: The Definitive Guide if you want to know more.

My next Mercurial post will be about using with Eclipse.
Monday, January 11, 2010

GWT and virtual toString methods

I ran into something very mysterious today with GWT 2.0. It took me quite a while to track down exactly what the root cause was, but I've narrowed it down to one specific thing.

Let's say you create an object like this:
public class TestObject {
  private Object value ; 
     
  public void setValue(Object value) { 
    this.value = value; 
  } 
     
  @Override public String toString() { 
    return value.toString(); 
  } 
} 
Then in your entry point you do this:
public class Gwt_test implements EntryPoint {
  public void onModuleLoad() { 
    RootPanel panel = RootPanel.get(); 
    HTML html = new  HTML(); 
    panel.add(html); 
        
    TestObject object = new TestObject(); 
    object.setValue(new  Object()); 
    object.setValue("Hello there"); 
        
    html.setHTML("<h1>" + object + "</h1>");
  } 
} 

You would expect when you do the GWT compile and run your server and navigate to the page, you would see "Hello there" on the screen. Well, if you use Google Chrome, you'd be right. But if you use IE, Safari, or FireFox you'll just see a blank page.

Why is this? Well, it turns out to be quite complicated, and I only understand it up to a point. But this is what I have figured out so far.

You'll notice in the onModuleLoad method of the Gwt_test class after I create an instance of TestObject I set the value to 'new Object()' and then to a String. This is there so that when the GWT compiler generates code for the TestObject toString method, it has to take into account that the 'value' field may be an Object or a String. Which means it has to do a call to toString__devirtual$ in order to generate a string for the 'value' field. If you have GWT generate readable JavaScript you can look at it. The toString method for TestObject looks like this:
function toString_7(){
  toString__devirtual$(this.value); 
} 
Now, this is the part that I don't understand. For some reason this code causes a JavaScript error in browsers other than Chrome. If you go to the page in FireFox and open Firebug, you'll see it has a JavaScript error that says, 'can't convert object to primitive type'. Kind of strange. I really don't get why this is happening, or why it works in Chrome, but I do have a fix.

The easiest way to fix this is to just change the toString method on the TestObject class. Instead of calling the toString method on the value field, just do a string concatenation. So now TestObject looks like this:
public  class  TestObject {
  private Object value ; 
     
  public void setValue(Object value) { 
    this.value = value; 
  } 
     
  @Override public String toString() { 
    return value + ""; 
  } 
} 
And the generated JavaScript for the method looks like this:
function toString_7() {
  return this.value + ''; 
} 
Now it will work in all browsers. I wish I could understand why the other code doesn't work. I looked at the toString__devirtual method, but didn't really understand where the problem was coming from. But at least I have a workaround.